How to Host WPF Controls in a Delphi Application and Delphi Controls in a WPF Application

In this post, I will be showing how you can host a WPF UserControl in a Delphi application and a Delphi VCL TFrame in a WPF application. To achieve this, we will use a Type Library. A Type Library is going to allow our C# code to talk to our Delphi code, and vice-versa. Let’s start with hosting a Delphi VCL TFrame in WPF.

Part I: Hosting Delphi in WPF
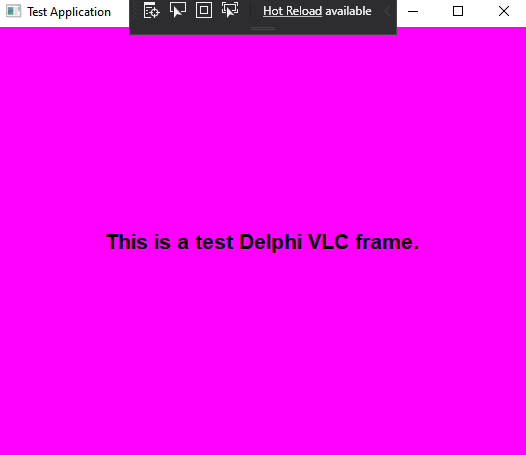
Firstly, create a new project in Delphi, under File > New > Other… expand Delphi and select Windows. Choose ActiveX Library. It will provide you with a *.ridl editor right away. Modify this IDL right away by defining your class as follows:

  • Give your top-level object in the tree view a unique name such as DelphiCOMService.
  • Right click DelphiCOMService and select New > Interface. This will allow us to define our COM interface which we will be able to use from C#.
  • Give your interface a unique name such as IDelphiCOMService. Make it have a Parent Interface of IUnknown. There are different parent interfaces you can choose; IUnknown is the most light-weight for our purposes.
  • Right click the interface and add a couple of new methods. One will be called GetDelphiFrame, the other WindowResized.
  • Set up their parameters by modifying their Parameters tab.
  • GetDelphiFrame will return a void* as its Return Type. It will take two parameters, a width and a height parameter with each of them having an [in] modifier, both of which will be a double. It will be called to instantiate our VCL TFrame and return back a pointer to it for consumption in WPF.
  • WindowResized will be the same except its Return Type will be an HRESULT. It will be called when the WPF window is resized and we need to resize our VCL TFrame.
  • Right click DelphiCOMService and select New > CoClass. Name it DelphiCOMServiceImplementation. Give it a unique GUID such as {D448873F-EAF7-4F40-8BC7-EF9853E64A0F}. Under the Implements tab, add the IDelphiCOMService interface. This tells Delphi what class we are going to eventually create inside of a new Delphi unit that will house our interface. Hence, this is exactly what a CoClass is, as per the name.

Create the following Delphi unit named DelphiCOMServiceUnit.pas:

unit DelphiCOMServiceUnit;

interface

uses SysUtils, ComObj, ComServ, DelphiCOMService_TLB, Winapi.ActiveX, StdVcl, Frame, Vcl.Forms, Winapi.Windows, Form;

type
  DelphiCOMServiceImplementation = class(TComObject, IDelphiCOMService)
  private
    MainFrame: TMainFrame;
    MainHandle: Cardinal;
    MainPointer: Pointer;
    MainForm: TMainForm;
  protected
    function GetDelphiFrame(width: Double; height: Double): Pointer; stdcall;
    procedure WindowResized(width: Double; height: Double); safecall;
  end;

implementation

function DelphiCOMServiceImplementation.GetDelphiFrame(width: Double; height: Double): Pointer; stdcall;
begin
  MainForm := TMainForm.Create(Application);
  MainForm.ClientWidth := Trunc(width);
  MainForm.ClientHeight := Trunc(height);
  MainHandle := MainForm.Frame.Handle;
  MainPointer := System.Pointer(MainHandle);
  Result := MainPointer;
end;

procedure DelphiCOMServiceImplementation.WindowResized(width: Double; height: Double); safecall;
begin
  MainForm.ClientWidth := Trunc(width);
  MainForm.ClientHeight := Trunc(height);
end;

initialization

TComObjectFactory.Create(ComServer, DelphiCOMServiceImplementation, StringToGUID('{D448873F-EAF7-4F40-8BC7-EF9853E64A0F}'), 'DelphiCOMServiceImplementation', '', ciMultiInstance, tmApartment);

end.

Add the following VCL Form to the project:

unit Form;

interface

uses
  Winapi.Windows, Winapi.Messages, System.SysUtils, System.Variants, System.Classes, Vcl.Graphics,
  Vcl.Controls, Vcl.Forms, Vcl.Dialogs, Frame;

type
  TMainForm = class(TForm)
    MainFrame: TMainFrame;
  private
    { Private declarations }
  public
    property Frame: TMainFrame read MainFrame;
  end;

var
  MainForm: TMainForm;

implementation

{$R *.dfm}

end.

Add the following VCL Frame to the project:

unit Frame;

interface

uses
  Winapi.Windows, Winapi.Messages, System.SysUtils, System.Variants, System.Classes,
  Vcl.Graphics, Vcl.Controls, Vcl.Forms, Vcl.Dialogs, Vcl.StdCtrls;

type
  TMainFrame = class(TFrame)
    FrameLabel: TLabel;
  private
    { Private declarations }
  public
    { Public declarations }
  end;

implementation

{$R *.dfm}

end.
  • Add the VCL Frame to your VCL Form and name it MainFrame. Make sure it resizes with the size of the form. Add a TLabel to your VCL Frame named FrameLabel. Throw some text in it, make sure its centered inside of the frame, and that it resizes with the size of the frame.
  • Go back to your IDL. Hit Refresh Implementation, Register Type Library, and Save As Type Library File. Run the application in order to register the Delphi COM service.

What did we just do?

  • We created and registered a new COM service, which we can call from C#.
  • DelphiCOMServiceUnit houses the service.
  • DelphiCOMServiceUnit creates a new Delphi VCL Form and returns back a pointer to the VCL Frame it houses when GetDelphiFrame is called.
  • DelphiCOMServiceUnit resizes the Delphi VCL Form and thus the VCL Frame as appropriate when the WindowResized function is called.
  • DelphiCOMServiceUnit implements IUnknown, which is why it subclasses TComObject. It also uses TComObjectFactory.Create in order to tell Delphi to register this unit as our CoClass.
  • If DelphiCOMServiceUnit were to implement IDispatch, it should subclass TAutoObject and use TAutoObjectFactory.Create instead.

How do we use this new COM object?

  • Create a new WPF project.
  • Add a reference under the COM tab to this DelphiCOMService.
  • In MainWindow.xaml, add the following border:
<Border BorderThickness="0" Padding="0" Margin="0" x:Name="DelphiHostElement" SizeChanged="MainCanvas_OnSizeChanged"/>
  • Handle the Activated event in MainWindow.
  • Modify MainWindow.xaml.cs as follows:
using System;
using System.Runtime.InteropServices;
using System.Windows;
using DelphiCOMService;

namespace WPFApplication
{
    public partial class MainWindow : Window
    {

        [DllImport("msvcr110.dll", CallingConvention = CallingConvention.Cdecl)]
        public static extern int _fpreset();

        private DelphiCOMServiceImplementation service;

        public MainWindow()
        {
            _fpreset();
            InitializeComponent();
        }

        private void MainWindow_OnActivated(object sender, EventArgs e)
        {
            if (service != null)
                return;
            service = new DelphiCOMServiceImplementation();
            var control = service.GetDelphiFrame(DelphiHostElement.ActualWidth, DelphiHostElement.ActualHeight);
            DelphiHostElement.Child = new DelphiControlHost(DelphiHostElement.ActualWidth, DelphiHostElement.ActualHeight, control);
        }

        private void MainCanvas_OnSizeChanged(object sender, SizeChangedEventArgs e)
        {
            service?.WindowResized(DelphiHostElement.ActualWidth, DelphiHostElement.ActualHeight);
        }
    }
}

  • Add the following class in as DelphiControlHost.cs:
using System;
using System.Windows.Interop;
using System.Runtime.InteropServices;

namespace WPFApplication
{
    public class DelphiControlHost : HwndHost
    {

        [DllImport("user32.dll")]
        static extern IntPtr CreateWindowEx(int dwExStyle, string lpszClassName, string lpszWindowName, int style, int x, int y, int width, int height, IntPtr hWndParent, IntPtr hMenu, IntPtr hInstance, IntPtr lpParam);

        [DllImport("user32.dll")]
        static extern IntPtr SetParent(IntPtr hWndChild, IntPtr hWndNewParent);

        [DllImport("user32.dll")]
        static extern bool ShowWindow(IntPtr hWnd, int nCmdShow);

        [DllImport("user32.dll")]
        static extern bool DestroyWindow(IntPtr hWnd);

        int height;
        int width;
        IntPtr child;

        public DelphiControlHost(double initialWidth, double initialHeight, IntPtr hostedControl)
        {
            width = (int)initialWidth;
            height = (int)initialHeight;
            child = hostedControl;
        }

        protected override HandleRef BuildWindowCore(HandleRef hwndParent)
        {
            var host = CreateWindowEx(0, "static", null, 0x40000000 | 0x10000000, 0, 0, height, width, hwndParent.Handle, IntPtr.Zero, IntPtr.Zero, IntPtr.Zero);
            SetParent(child, host);
            ShowWindow(child, 5);
            return new HandleRef(this, host);
        }

        protected override void DestroyWindowCore(HandleRef hwnd)
        {
            DestroyWindow(hwnd.Handle);
        }
    }
}

What is happening here?

  • The border we added in is actually our Delphi VCL Frame host.
  • When our window activates, it gets a handle to the Delphi frame by calling our COM object.
  • We use the DelphiControlHost like a child canvas for which we create a native window.
  • The DelphiControlHost takes the Delphi frame handle and make it a child of its native window.
  • We then call ShowWindow to show our Delphi VCL Frame in this border.
  • The OnSizeChanged event handles any VCL Frame resizing we might need from Delphi.

Part II: Hosting WPF in Delphi
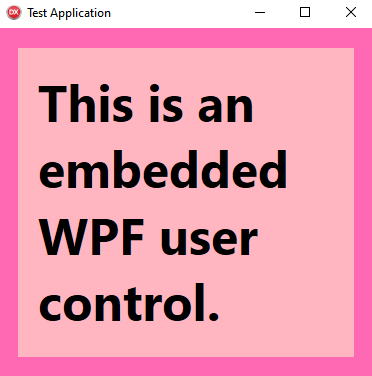
  • Create a new .NET Framework Class Library named WPFCOMService.
  • Right click the library and select Properties.
  • Under the Build tab, select Register for COM interop.
  • Add the following class named WPFCOMService.cs to this class library:
using System;
using System.Diagnostics;
using System.Runtime.InteropServices;
using System.Windows;
using System.Windows.Interop;
using System.Windows.Threading;
using WPFApplication;

namespace WPFCOMService
{
    [Guid("264A4D5A-C680-486A-B1DD-C265EFA1C201")]
    [ClassInterface(ClassInterfaceType.None)]
    [ComVisible(true)]
    public sealed class WPFCOMService : IWPFCOMService
    {

        [DllImport("user32.dll")]
        static extern void ShowWindow(IntPtr hWnd, int nCmdShow);

        static EmbeddedUserControl UserControl;
        static IntPtr UserControlPointer;
        static Dispatcher UserInterfaceThread;

        public void EmbedWPFWindow(IntPtr pointer, int width, int height)
        {
            Debugger.Launch();
            UserControlPointer = pointer;
            UserControl = new EmbeddedUserControl
            {
                Width = width, 
                Height = height
            };
            UserControl.InitializeComponent();
            var param = new HwndSourceParameters
            {
                WindowStyle = 0x40000000 | 0x04000000 | 0x02000000, 
                ParentWindow = UserControlPointer
            };
            var hWndSource = new HwndSource(param)
            {
                SizeToContent = SizeToContent.WidthAndHeight, 
                RootVisual = UserControl
            };
            ShowWindow(hWndSource.Handle, 5);
            UserInterfaceThread = Dispatcher.CurrentDispatcher;
        }

        public void WindowResized(int width, int height)
        {
            UserInterfaceThread?.Invoke(() =>
            {
                UserControl.Width = width;
                UserControl.Height = height;
            });
        }
    }

    [ComVisible(true)]
    [Guid("06AD88DA-7BC3-4D3B-98E4-B383C7C55E38")]
    public interface IWPFCOMService
    {
        void EmbedWPFWindow(IntPtr pointer, int width, int height);
        void WindowResized(int width, int height);
    }
}

  • When this project builds, it will register a COM object named WPFCOMService with the IWPFCOMService interface. The WPFCOMService.cs file houses our CoClass.
  • I will add a reference in this class library project to the WPF project I created before, but you can use any WPF project.
  • I added the EmbeddedUserControl, a simple user control to my referenced WPF project.
  • I use this control in my two C# COM object functions, in which I initialize and keep track of a WPF UserControl and its settings.
  • The EmbedWPFWindow function takes a pointer to a Delphi window and embeds the EmbeddedUserControl into this Delphi window by using HwndSourceParameters to set the Delphi window as its ParentWindow along with the appropriate child WindowStyle.
  • The WindowResized function takes a width and a height from Delphi and resizes the control as appropriate.

How do we use this COM object in Delphi?

  • Create a new VCL Form project in Delphi.
  • Go to the Component tab and select Import Component…
  • Select Import a Type Library.
  • Choose WPFCOMService (you should see it if you build the class library we created above).
  • Go to the Pascal code in your main form, Main.pas, and update it as follows to use our C# class library:
unit Main;

interface

uses
  Winapi.Windows, Winapi.Messages, System.SysUtils, System.Variants, System.Classes, Vcl.Graphics,
  Vcl.Controls, Vcl.Forms, Vcl.Dialogs, WPFCOMService_TLB, Vcl.ExtCtrls;

type
  TMainForm = class(TForm)
    procedure FormActivate(Sender: TObject);
  private
    service: IWPFCOMService;
    thread: TThread;
    isMoving: Boolean;
    procedure WMEnterSizeMove(var Message: TMessage) ; message WM_ENTERSIZEMOVE;
    procedure WMMove(var Message: TMessage) ; message WM_MOVE;
    procedure WMExitSizeMove(var Message: TMessage) ; message WM_EXITSIZEMOVE;
    procedure PerformResize;
  public
    { Public declarations }
  end;

var
  MainForm: TMainForm;

implementation

{$R *.dfm}

procedure TMainForm.FormActivate(Sender: TObject);
begin
  if (service = nil) then
    service := CoWPFCOMService_.Create();
  service.EmbedWPFWindow(Handle, ClientWidth, ClientHeight);
end;

procedure TMainForm.WMEnterSizeMove(var Message: TMessage) ;
begin
  thread := TThread.CreateAnonymousThread(
    procedure
    begin
      while (isMoving) do
      begin
        PerformResize;
        Sleep(10);
      end;
      PerformResize;
    end
  );
  isMoving := True;
  thread.Start;
end;

procedure TMainForm.WMMove(var Message: TMessage) ;
begin
  PerformResize;
end;

procedure TMainForm.WMExitSizeMove(var Message: TMessage) ;
begin
  isMoving := False;
end;

procedure TMainForm.PerformResize;
begin
  if (service = nil) then
    exit;
  service.WindowResized(ClientWidth, ClientHeight);
end;

end.
  • Make sure to bind the Event named OnActivate of the main VCL Form to the FormActivate procedure.

Sample Projects

Finally, you can download the complete source code of my implementation. Note that, you use this code at your own risk and are entirely liable for any problems that may arise out of it, whatsoever. I do ask that if you use my code, you give me a little credit. Just throw my name in a comment somewhere. Here is the download link: Projects.zip.

How to Generate Wave Files with Random Audio Data in C#

If you want to generate *.wav files with random audio data in C#, you’ve come to the right place. Check out the code below, which you can simply dump into a fresh console application and test run. You can also use the code below to convert from floating point audio samples which have a range from -1 to 1 (both inclusive) into WAVE PCM audio files.

using System;
using System.Collections.Generic;
using System.Diagnostics;
using System.IO;

namespace RandomAudioGenerator
{
	internal class Program
	{
		private static void Main(string[] args)
		{
			var random = new Random();
			var data = new float[random.Next(1, 1000001)];
			for (var i = 0; i < data.Length; i++)
			{
				data[i] = (float)random.Next(0, 65537) / 65536;
				if (random.Next(0, 2) == 0)
					data[i] = -data[i];
			}
			var directory = Directory.GetCurrentDirectory();
			var path = Path.Combine(directory, Guid.NewGuid() + ".wav");
			GenerateAudioFile(path, data, 1, 44000);
			Process.Start("explorer.exe", "/select, " + path);
		}

		private static void GenerateAudioFile(string path, IReadOnlyCollection data, int channels, int frequency)
		{
			using (var stream = new FileStream(path, FileMode.CreateNew, FileAccess.Write))
			{
				// The following values are based on http://soundfile.sapp.org/doc/WaveFormat/
				const ushort bitsPerSample = (ushort)16;
				const string chunkId = "RIFF";
				const string format = "WAVE";
				const string subChunk1Id = "fmt ";
				const uint subChunk1Size = (uint)16;
				const ushort audioFormat = (ushort)1;
				var numChannels = (ushort)channels;
				var sampleRate = (uint)frequency;
				var byteRate = (uint)(sampleRate * channels * bitsPerSample / 8);  // SampleRate * NumChannels * BitsPerSample/8
				var blockAlign = (ushort)(numChannels * bitsPerSample / 8); // NumChannels * BitsPerSample/8
				const string subChunk2Id = "data";
				var subChunk2Size = (uint)(data.Count * channels * bitsPerSample / 8); // NumSamples * NumChannels * BitsPerSample/8
				var chunkSize = (uint)(36 + subChunk2Size); // 36 + SubChunk2Size
				// Start writing the file.
				WriteString(stream, chunkId);
				WriteInteger(stream, chunkSize);
				WriteString(stream, format);
				WriteString(stream, subChunk1Id);
				WriteInteger(stream, subChunk1Size);
				WriteShort(stream, audioFormat);
				WriteShort(stream, numChannels);
				WriteInteger(stream, sampleRate);
				WriteInteger(stream, byteRate);
				WriteShort(stream, blockAlign);
				WriteShort(stream, bitsPerSample);
				WriteString(stream, subChunk2Id);
				WriteInteger(stream, subChunk2Size);
				foreach (var sample in data)
				{
					// De-normalize the samples to 16 bits.
					var deNormalizedSample = (short)0;
					if (sample > 0)
					{
						var temp = sample * short.MaxValue;
						if (temp > short.MaxValue)
							temp = short.MaxValue;
						deNormalizedSample = (short)temp;
					}
					if (sample < 0)
					{
						var temp = sample * (-short.MinValue);
						if (temp < short.MinValue)
							temp = short.MinValue;
						deNormalizedSample = (short)temp;
					}
					WriteShort(stream, (ushort)deNormalizedSample);
				}
			}
		}

		private static void WriteString(Stream stream, string value)
		{
			foreach (var character in value)
				stream.WriteByte((byte)character);
		}

		private static void WriteInteger(Stream stream, uint value)
		{
			stream.WriteByte((byte)(value & 0xFF));
			stream.WriteByte((byte)((value >> 8) & 0xFF));
			stream.WriteByte((byte)((value >> 16) & 0xFF));
			stream.WriteByte((byte)((value >> 24) & 0xFF));
		}

		private static void WriteShort(Stream stream, ushort value)
		{
			stream.WriteByte((byte)(value & 0xFF));
			stream.WriteByte((byte)((value >> 8) & 0xFF));
		}
	}
}

The Enhanced Metafile (EMF) Vector Image Format

It looks like we have some support in Windows for vector images using the EMF file format. EMFs (Enhanced Metafiles) let you save both vectors and bitmaps within them. However, if you use the Metafile constructor properly, you can save to disk and load from disk the entire sequence of operations that are a part of this vector format. Here is an example of how you can get started with Metafiles:

using System;
using System.Drawing;
using System.Drawing.Drawing2D;
using System.Drawing.Imaging;
using System.IO;
using System.Runtime.InteropServices;
using System.Drawing.Text;

namespace ExtendedMetafileApplication
{
    class Program
    {

        [DllImport("gdiplus.dll")]
        private static extern uint GdipEmfToWmfBits(IntPtr hemf, uint cbData16, byte[] pData16, int iMapMode, int eFlags);

        static void Main(string[] args)
        {
            // Create an EMF vector image stream in memory.
            using (var metaStream = CreateMemoryEMF())
            {
                // Saving the vector image as an EMF file to disk.
                CreateDiskEMF("Image.emf", metaStream);
                // Save the vector image as its rasterized PNG counterparts at different scales.
                CreateDiskPNG("Image.png", metaStream);
                CreateDiskPNG("Image5X.png", metaStream, 5);
                CreateDiskPNG("Image10X.png", metaStream, 10);
                // Save the vector image to disk as a WMF (also a vector format for images).
                CreateDiskWMF("Image.wmf", metaStream);
            }
        }

        static void CreateDiskWMF(string path, Stream metaStream)
        {
            using (var metafile = new Metafile(metaStream))
            {
                var iMapMode = 3; // MM_HIMETRIC
                var eFlags = 2; // EmfToWmfBitsFlagsIncludePlaceable
                var hemf = metafile.GetHenhmetafile();
                // The stream of our EMF image must be created using EmfPlusDual in order for the following function to work.
                var size = GdipEmfToWmfBits(hemf, 0, null, iMapMode, eFlags);
                var buffer = new byte[size];
                GdipEmfToWmfBits(hemf, size, buffer, iMapMode, eFlags);
                File.WriteAllBytes(path, buffer);
            }
            metaStream.Seek(0, SeekOrigin.Begin);
        }

        static void SetGraphicsQuality(Graphics graphics)
        {
            graphics.CompositingQuality = CompositingQuality.HighQuality;
            graphics.InterpolationMode = InterpolationMode.HighQualityBicubic;
            graphics.CompositingMode = CompositingMode.SourceOver;
            graphics.SmoothingMode = SmoothingMode.AntiAlias;
            graphics.PixelOffsetMode = PixelOffsetMode.HighQuality;
            graphics.TextRenderingHint = TextRenderingHint.AntiAliasGridFit;
        }

        static void CreateDiskPNG(string path, Stream metaStream, float scale = 1)
        {
            var image = Image.FromStream(metaStream);
            metaStream.Seek(0, SeekOrigin.Begin);
            var bitmap = new Bitmap(image, (int)(image.Size.Width * scale), (int)(image.Size.Height * scale));
            using (var graphics = Graphics.FromImage(bitmap))
            {
                SetGraphicsQuality(graphics);
                graphics.DrawImage(image, 0, 0, bitmap.Width, bitmap.Height);
                bitmap.Save(path, ImageFormat.Png);
            }
        }

        static void DrawGraphics(Metafile metafile)
        {
            var brush = Brushes.BlueViolet;
            var pen = new Pen(brush, 3);
            using (var graphics = Graphics.FromImage(metafile))
            {
                graphics.Clear(Color.White);
                SetGraphicsQuality(graphics);
                graphics.DrawEllipse(pen, 2.5f, 2.5f, 45, 45);
                graphics.DrawEllipse(pen, 52.5f, 2.5f, 45, 45);
                graphics.FillEllipse(brush, 4f, 15f, 25, 25);
                graphics.FillEllipse(brush, 54f, 15f, 25, 25);
                graphics.DrawArc(pen, 30, 55, 50, 35, 90, 180);
                graphics.DrawArc(pen, 5, 45, 90, 70, 0, 180);
                graphics.DrawString("Hello, world.", new Font(FontFamily.GenericSerif, 14), brush, new Rectangle(0, 120, 150, 30));
            }
        }

        static Stream CreateMemoryEMF()
        {
            var result = new MemoryStream();
            Metafile metafile;
            using (var graphics = Graphics.FromHwnd(IntPtr.Zero))
            {
                SetGraphicsQuality(graphics);
                var context = graphics.GetHdc();
                metafile = new Metafile(result, context, EmfType.EmfPlusDual);
                graphics.ReleaseHdc(context);
            }
            DrawGraphics(metafile);
            result.Flush();
            result.Seek(0, SeekOrigin.Begin);
            return result;
        }

        static void CreateDiskEMF(string path, Stream metaStream)
        {
            using (var fileStream = File.Create(path))
                metaStream.CopyTo(fileStream);
            metaStream.Seek(0, SeekOrigin.Begin);
        }
    }
}

The code above outputs the following set of images:

Image.emf

Image.png

Image5X.png

Image10X.png

Image.wmf

If you’re looking for a nice way to do some simple graphics in Windows applications for business or otherwise, this is probably one of the best formats to use if you want to be able to scale.

How to Play Mode Unit Test a Prefab in Unity

Let’s say you have an existing Unity game and you would like to test a prefab exclusively by itself. No problem, you’ve come to the right place. You can do this using what is called a Play Mode unit test. Here is some sample code to help get you started:

[UnityTest]
[Timeout(180000)] // Sets the timeout of the test in milliseconds (if the test hangs, this will ensure it closes after 3 minutes).
public IEnumerator TestAnimationAnimUtilityPrefab()
{
	// Remove the default skybox.
    RenderSettings.skybox = null;
    // Create a new root game object.
    var root = new GameObject();
	// Attach a camera to our root game object.
    root.AddComponent(typeof(Camera));
	// Get a reference to the camera.
    var camera = root.GetComponent<Camera>();
    // Set the camera's background color to white.
    camera.backgroundColor = Colors.white;
    // Add our game object (with the camera included) to the scene by instantiating it.
    root = GameObject.Instantiate(root);
	// Load a prefab (by giving it the path to an existing prefab).
	var prefab = AssetDatabase.LoadAssetAtPath<GameObject>("Assets/Example.prefab");
	// Instantiate the prefab (by adding it to the scene). Use the Quaternion to set the rotation in degrees and the Vector3 to set the position in 3D space.
	prefab = GameObject.Instantiate(prefab, new Vector3(0, 0, 10), new Quaternion(0, 180, 0, 0));
	// Wait for three seconds (this gives us time to see the prefab in the scene if its an animation or something else).
	yield return new WaitForSeconds(3f);
	// In this example, let's assume that our Example.prefab has a script on it called ExampleScript.
	var script = prefab.gameObject.GetComponentInChildren<ExampleScript>();
	// Assert that the script exists on our prefab so we don't stumble upon this problem in the future.
    Assert.IsTrue(script != null, "ExampleScript must be set on Example.prefab.");
	// Finally, we should clean up our scene by destroying our objects.
	GameObject.Destroy(prefab);
	GameObject.Destroy(root);
}

Unity Quickies: Zooming, Dragging, and Panning the Camera in 3D Space

Here is a script I wrote which you can apply to your existing 3D camera in order to perform various functions such as zooming, dragging, or panning the main camera. It worked best for me in a chess game I was writing while learning Unity, in which I had to display a chess board to the user and allow him to move around the board inside of the game.

using UnityEngine;

public class Scene : MonoBehaviour
{

    Vector3 lastDragPosition, lastPanPosition;

    void Update()
    {
        UpdateZoom();
        UpdateDrag();
        UpdatePan();
    }

    void UpdateZoom()
    {
        var isMoving = Mathf.Abs(Input.mouseScrollDelta.y) > 0;
        if (!isMoving)
            return;
        var isZoomingIn = Input.mouseScrollDelta.y > 0;
        transform.position = transform.position +
                             transform.forward.normalized * Time.deltaTime * (isZoomingIn ? 15f : -15f);
    }

    void UpdateDrag()
    {
        if (Input.GetMouseButtonDown(2))
            lastDragPosition = Input.mousePosition;
        if (!Input.GetMouseButton(2))
            return;
        var delta = lastDragPosition - Input.mousePosition;
        transform.Translate(delta * Time.deltaTime * 0.5f);
        lastDragPosition = Input.mousePosition;
    }

    void UpdatePan()
    {
        if (Input.GetMouseButtonDown(1))
            lastPanPosition = Input.mousePosition;
        if (!Input.GetMouseButton(1))
            return;
        var delta = lastPanPosition - Input.mousePosition;
        transform.RotateAround(transform.position, Vector3.up, delta.normalized.x * Time.deltaTime * 25f);
        transform.RotateAround(transform.position, transform.right, -delta.normalized.y * Time.deltaTime * 25f);
        lastPanPosition = Input.mousePosition;
    }
}

How to Find the Hash Rate of a GPU for Mining Ethereum on Windows

I have a laptop with the GeForce GTX 980M on it. I want to find out what my hash rate is to see what my profits could be from mining Ethereum over the Windows platform. Here’s how to do this:

  • Download the latest release of ethminer. Make sure to download the Latest release and not the Pre-release. Unzip it somewhere.
  • Open the command prompt to where you downloaded and unzipped ethminer. Run the ethminer -U -M command:
 C:\Downloads\ethminer-0.11.0-Windows>ethminer -U -M
 Using grid size 8192, block size 128
 Benchmarking on platform: CUDA
 Preparing DAG for block #0
 Warming up...
 i 13:04:52|cudaminer0 set work; seed: #00000000, target: #000000000000
 i 13:04:52|cudaminer0 Initialising miner...
 Using device: GeForce GTX 980M (Compute 5.2)
 Generating DAG for GPU #0
 CUDA#0: 0%
 CUDA#0: 6%
 CUDA#0: 13%
 CUDA#0: 19%
 CUDA#0: 25%
 CUDA#0: 31%
 CUDA#0: 38%
 CUDA#0: 44%
 CUDA#0: 50%
 CUDA#0: 56%
 CUDA#0: 63%
 CUDA#0: 69%
 CUDA#0: 75%
 CUDA#0: 81%
 CUDA#0: 88%
 CUDA#0: 94%
 Trial 1... 13277536
 Trial 2... 12578719
 Trial 3... 13273113
 Trial 4... 12570341
 Trial 5... 13277536
 min/mean/max: 12570341/12995449/13277536 H/s
 inner mean: 13043122 H/s
  • The inner mean is your hash rate. I’m sitting at about 13043122 H/s, which according to some online mining profitability calculator, could earn me about $30.45 / month if I don’t have to pay for electricity.

What is char ** in C or C++? Explaining Functions that Return char **

I just came across a weird API method in a C library for Windows that returned a list of strings as char **. Obviously, to read this back you need to know when to stop enumerating, so it told me this list is NULL terminated (terminated by a NULL pointer). Pretty cool, but I had no clue how to even allocate or to free this data type properly so I set up to create a proper example in a Visual C++ console application, since I couldn’t find any good articles on this online. So, effectively this list lives as a pointer to a pointer to a string. Here is how you can create one, read one back, and free one:

#include "stdafx.h"
#include <malloc.h>
#include <string.h>
 
char ** get_list() {
    char **result = (char **)malloc(3 * sizeof(char *));
    char *valueOne = new char[14];
    strcpy_s(valueOne, 14, "Hello, world.");
    result[0] = valueOne;
    char *valueTwo = new char[14];
    strcpy_s(valueTwo, 14, "Hello, again.");
    result[1] = valueTwo;
    result[2] = NULL;
    return result;
}
 
void free_list(char **list) {
    int i = 0;
    while (true) {
        char *value = *(list + i);
        if (value == NULL)
            break;
        delete[] value;
        i++;
    }
    free(list);
}
 
int main()
{
    char **list = get_list();
    int i = 0;
    while (true) {
        char *value = *(list + i);
        if (value == NULL)
            break;
        printf(value);
        printf("\n");
        i++;
    }
    free_list(list);
    return 0;
}

Hopefully you won’t have to spend a few hours on this like I just did. In addition, you would only use such a structure in production if you knew that none of your strings are ever to be NULL, or else they’d be mistaken for the NULL terminator and your deallocation method will fail miserably.

From Coding to Optics with the Sony a7R II

I feel its time to take a short break from blogging about code, so here are some photos. I took them recently on my Sony a7R II (man, what a camera). I shot them quite exclusively with either the Tamron SP 150-600MM F/5-6.3 Di VC USD lens using the LA-EA3 35mm Full-Frame A-Mount Adapter or via the Sony Vario-Tessar T* FE 16–35 mm F4 ZA OSS lens. Note that some of these Jay’s baseball game shots were literally up in the nosebleeds. I don’t think we could have gotten seats any further from the action.

Leveraging Func<Task> and Getting Funky

Asynchronous programming is a bit nightmarish, but hopefully this sheds some light upon how you can leverage certain delegate types. Take this example, where you want an abstraction layer for calling a block of code up to a set number of attempts until it succeeds, otherwise having it delegate back the exception you’ve obtained on the very last attempt:

class Program
{
	static void Main(string[] args)
	{
		// Since this is a console application, I just ran everything inside of an async task.
		Task.Run(async () => {
			bool throwException = true;
			var firstResult = await AttemptBlock.Run(async () => {
				Console.WriteLine("X called.");
				if (throwException)
				{
					throwException = false;
					throw new Exception();
				}
				await AttemptBlock.Run(async () =>
				{
					Console.WriteLine("Y called.");
					await Z();
					Console.WriteLine("Y finished.");
				}, 3, async (exception) =>
				{
					await Task.Run(() =>
					{
						Console.WriteLine("Y exception handler called.");
					});
				});
				Console.WriteLine("X finished.");
			}, 3, async (exception) =>
			{
				await Task.Run(() =>
				{
					Console.WriteLine("X exception handler called.");
				});
			});
			Console.WriteLine("Finished the first block with {0}.", firstResult);
			var secondResult = await AttemptBlock.Run(async () =>
			{
				Console.WriteLine("O called.");
				await Z();
				throw new Exception();
			}, 3, async (exception) =>
			{
				await Task.Run(() =>
				{
					Console.WriteLine("O exception handler called.");
					throw new Exception();
				});
			});
			Console.WriteLine("Finished the second block with {0}.", secondResult);
		});
		Console.ReadLine();
	}

	private async static Task<bool> Z()
	{
		Console.WriteLine("Z called.");
		await Task.Delay(1000);
		Console.WriteLine("Z finished.");
		return true;
	}
}

class AttemptBlock
{
	public async static Task<bool> Run(Func<Task> function, int attempts, Func<Exception, Task> handler = null)
	{
		while (attempts > 0)
		{
			var candidate = (Exception)null;
			try {
				await function();
				return true;
			} // If this try-catch block was not here, the function could deadlock if it threw an exception.
			catch (Exception exception) {
				candidate = exception;
			}
			attempts--;
			if (attempts <= 0 && handler != null && candidate != null)
				try {
					await handler(candidate);
				}
				catch { } // If this try-catch block was not here, the handler could deadlock if it threw an exception.
		}
		return false;
	}
}

The output is as follows:

X called.
X called.
Y called.
Z called.
Z finished.
Y finished.
X finished.
Finished the first block with True.
O called.
Z called.
Z finished.
O called.
Z called.
Z finished.
O called.
Z called.
Z finished.
O exception handler called.
Finished the second block with False.

You may also want to check out this post on Synchronous and Asynchronous Delegate Types.

Using Google’s reCAPTCHA Version 2.0 on ASP.NET MVC with AJAX

So, you want to add the latest reCAPTCHA Version 2.0 to your existing MVC website, you want to make it secure with server-side validation, and you want to make it asynchronous and have a rich user experience with AJAX? No problem. Start by adding div’s into the forms you need. Their ID’s will indicate where we want to place CAPTCHA elements. Note for all intents and purposes I am using two different CAPTCHA elements on the same page, just to illustrate it can be done, and done nicely:

<form id="register-form">
    <div id="register-captcha"></div>
    <button id="register-button" type="button" class="btn btn-default">Register</button>
</form>
<form id="contact-form">
    <div id="contact-captcha"></div>
    <button id="contact-button" type="button" class="btn btn-default">Send</button>
</form>

Then wire these up. Take note of how the reCAPTCHA API allows us to tell it what loading method to use and what type of rendering we want (explicit, in this case). This is very important, as it allows us to control the CAPTCHA in JavaScript. Also, make sure to include your site key in the rendering calls:

@section Scripts
{
    <script type='text/javascript'>
        // CAPTCHA loading methods.
        var registrationCaptchaID = null;
        var contactCaptchaID = null;
        var loadCaptcha = function () {
            registrationCaptchaID = grecaptcha.render('register-captcha', {
                'sitekey': '1234567890123456789012345678901234567890',
                'callback': function (response) {
                    registrationCaptchaResponse = response;
                }
            });
            contactCaptchaID = grecaptcha.render('contact-captcha', {
                'sitekey': '1234567890123456789012345678901234567890',
                'callback': function (response) {
                    contactCaptchaResponse = response;
                }
            });
        };
        // Register CAPTCHA section.
        var registrationCaptchaResponse = null;
        $('#register-button').click(function () {
            if (registrationCaptchaResponse == null)
                return;
            $.ajax({
                url: '@Url.Action("Register", "Home")',
                type: 'POST',
                data: {
                    recaptchaResponse: registrationCaptchaResponse
                },
                success: function (data, textStatus, jqXHR) {
                    registrationCaptchaResponse = null;
                    grecaptcha.reset(registrationCaptchaID);
                },
                error: function (jqXHR, textStatus, errorThrown) {
                    registrationCaptchaResponse = null;
                    grecaptcha.reset(registrationCaptchaID);
                }
            });
        });
        // Contact CAPTCHA section.
        var contactCaptchaResponse = null;
        $('#contact-button').click(function () {
            if (contactCaptchaResponse == null)
                return;
            $.ajax({
                url: '@Url.Action("Contact", "Home")',
                type: 'POST',
                data: {
                    recaptchaResponse: contactCaptchaResponse
                },
                success: function (data, textStatus, jqXHR) {
                    contactCaptchaResponse = null;
                    grecaptcha.reset(contactCaptchaID);
                },
                error: function (jqXHR, textStatus, errorThrown) {
                    contactCaptchaResponse = null;
                    grecaptcha.reset(contactCaptchaID);
                }
            });
        });
    </script>
    <script src="https://www.google.com/recaptcha/api.js?onload=loadCaptcha&render=explicit" async defer></script>
}

To validate this on the server-side, first set up the secret key in your configuration’s application settings section so you can quickly modify on the fly later on when you need to:

<configuration>
  <appSettings>
    <add key="reCAPTCHASecret" value="1234567890123456789012345678901234567890" />
  </appSettings>
</configuration>

Make use of it on an action post, and call the reCAPTCHA service to manually verify the user-obtained results:

public class reCAPTCHAResponse
{
    public bool Success { get; set; }
}

[HttpPost]
public ActionResult Register(string recaptchaResponse)
{
    if (String.IsNullOrEmpty(recaptchaResponse))
        throw new InvalidOperationException("Missing CAPTCHA response.");
    var client = new WebClient();
    var secret = ConfigurationManager.AppSettings["reCAPTCHASecret"];
    if (String.IsNullOrWhiteSpace(secret))
        throw new InvalidOperationException("Missing CAPTCHA configuration.");
    var response = client.DownloadString(String.Format("https://www.google.com/recaptcha/api/siteverify?secret={0}&response={1}", secret, recaptchaResponse));
    var serializer = new JavaScriptSerializer();
    var reCAPTCHA = serializer.Deserialize<reCAPTCHAResponse>(response);
    if (!reCAPTCHA.Success)
        throw new InvalidOperationException("Incorrect CAPTCHA response.");
    return Json(true); // At this point, the request is valid, and you can do whatever you wish.
}

That’s another case closed.